Vapor — Call an externe web service from your backend
How to execute HTTP call within a Vapor route
Sometimes, when a client call your backend, you need to call another web service to construct your response. For example, if you want to get data from Strava to return activities of a specific user or if you want to get the weather in a specific city, you will have to call an external web service.
As example, I’ll try to get my activities name from the Strava API.
💡 Tips: You can find the final code at the end of the article. 😉
Create the route
First of all, we have to create the route who will be responsible of getting data from the Strava API. My route will be like this: /:userUuid/activities.
If you don’t know how to create Vapor routes and organize them with Controllers, I suggest you to read those articles (Vapor — Create a GET route and Vapor — Use controller to organize your routes) first.
Here’s the starting code of the new route:

Right now, we only get the userUuid from the request and we return an empty String if we find any userUuid parameter, else, we throw a badRequest error.
Note: We will not use the userUuid in our example because we will use an hardcoded Strava access token instead, but in a production environment, you should have the Strava tokens linked to a userUuid. And so, you’ll need this userUuid.
Route return type
Because an external API call is asynchronous (we don’t have the response directly and we don’t know how much time it will take), we can’t return a String (or anything else) like this:

The solution is to use an EventLoopFuture of the type we want.
EventLoopFuture: Reference to a value that may not be available yet. — Vapor documentation
Because we want to return an array of activity name, we probably can use a String array, but to go a bit further, we’ll create a class Activity that contains the activity content. By doing this, if you want to add more information about activities, you’ll be able to do it easily.
Here is the basic Activity class we need:

This is a basic class with only one attribute: the name of the activity. The only thing to note here is that the class is conforming to the Content Vapor protocol and the Codable protocol.
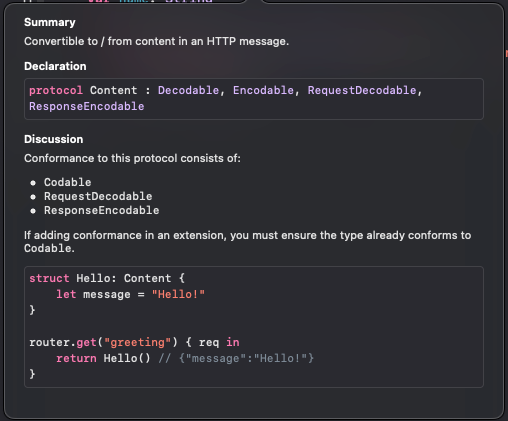
If you are curious about this protocol, feel free to Jump to his definition to see more details.
Now we have created our Activity class and we know we have to return an EventLoopFuture, we can update our route definition:

Create the Strava API URL
To get Strava data, we need to call the Strava API, so we need to define which URL our API will to call.
Strava API requires that we authenticate before to get our own activities, so we will need to add an authorization header to our request.
Authorization header
Because Strava Authorization header is a bearer, we will need an access token (and probably a refresh token if you push your application in production).
To only focus on the Vapor part, I’ll get a Strava access token and paste it directly to my code as a global variable (if you don’t know how to get started with Strava API, maybe you will appreciated to read this article: …)
⚠️ I do that only during the development phase; if you want to deploy your Vapor application, of course, it’s not a good idea. If you don’t know how to do that for production purpose, feel free to let me a comment and I’ll be happy to help you. ⚠️
Here is how you can construct an HTTPHeaders with an Authorization bearer:

URI
Now we have the request header, we can define our URI with the Strava API URL:

Perfect, we have the URL to call and his headers, we can now execute the request and try to get a response from the Strava API.
Execute the request
Get the client and start the GET request
To execute the request, we will need a Client. In fact we already have a client in our Request: request.client. So we can use it.
The Strava call we want to do is a GET method, so we can call the .get function to our client and we’ll pass it the URI and the headers:

By doing that, nothing will work. We need to execute this request and to return the transformed response.
Execute the request with flatMapThrowing
To execute the request, we’ll use the flatMapThrowing method directly on our GET function. By doing this, we’ll get the request response and so, we can next get the request status and content.

The advantage of the flatMapThrowing is that we can throw exception if we have to.
Check the status and decode the response
Now we have executed the request, wen can check the response status, throw and error if needed, and then, if no error, decode the response content to get a JSON, and finally transform the JSON to our Activity object.
The response status is available through the response object of course. We want to check if the status is .ok, else we want to throw an error (.unauthorized for example).
Let’s do that by using a guard statment:

Next we can get the response content and decode it (don’t forget to return it):
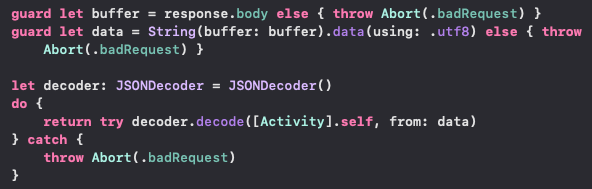
If we have any issue, we throw a .badRequest error.
Congratulation, when a client call to our API route (/:userUuid/activities), he get back our activities names as a JSON object:

Final code
Here is the final code in one place:
func getActivities(request: Request) throws -> EventLoopFuture<[Activity]> {
    guard let userUuid = request.parameters.get(“userUuid”) else { throw Abort(.badRequest) }

    let headers: HTTPHeaders = HTTPHeaders([(“Authorization”, “Bearer \(accessToken)”)])
    let uri: URI = URI(string: stravaActivitiesUrl)    return request.client.get(uri, headers: headers).flatMapThrowing { response in
        guard response.status == .ok else { throw Abort(.unauthorized) }
        guard let buffer = response.body else { throw Abort(.badRequest) }
        guard let data = String(buffer: buffer).data(using: .utf8) else { throw Abort(.badRequest) }        let decoder: JSONDecoder = JSONDecoder()
        do {
            return try decoder.decode([Activity].self, from: data)
        } catch {
            throw Abort(.badRequest)
        }
    }
}
🚀 What’s next?
Don’t forget to “clap” and share this article if you like it and want to see more content like this! 👏
If you have another way to call external API or if you have any question, I’ll be happy to read you in the comments section right bellow.
Thanks for reading,